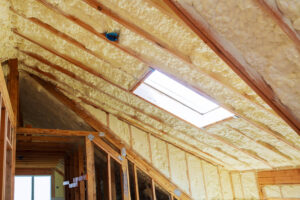
Spray foam insulation has two main visual appearances, a smooth or rough texture, depending on how it’s applied and the type used. Spray foam typically appears as a rigid, foam-like substance that can be either white, yellow, or cream and expands to fill spaces fully when properly installed.
Closed-cell spray foam has a smoother, more uniform appearance with a dense structure that resists water and provides a strong insulation value. Open-cell foam, on the other hand, tends to have a slightly rougher, more textured look that can sometimes appear uneven. Both types create an effective air barrier when installed correctly, though their visual differences reflect their different properties.
Properly installed spray foam should cover surfaces completely without gaps or voids, creating a continuous layer of insulation. This seamless coverage helps spray foam deliver outstanding comfort and energy savings compared to traditional insulation materials.
Understanding Spray Foam Insulation
Spray foam insulation is a versatile material that creates an air barrier and insulation layer when applied to walls, floors, and ceilings. It forms from two composite materials – polyurethane and isocyanate – that chemically react to expand and harden.
Types of Spray Foam Insulation
Spray foam insulation comes in two main varieties: open-cell and closed-cell foam. Each has distinct properties and best uses.
Open-Cell Foam:
- Lighter and less dense
- More flexible when cured
- Lower R-value (around R-3.5 per inch)
- More permeable to moisture
- Generally less expensive
- Better for sound-dampening
Closed-Cell Foam:
- Denser and more rigid
- Higher R-value (R-6 to R-7 per inch)
- Acts as a moisture barrier
- Adds structural strength to walls
- More expensive than open-cell
- Better for extreme temperatures
Professionals typically apply spray polyurethane foam (SPF) using either high-pressure or low-pressure systems, depending on the project size and requirements.
R-value and Thermal Performance
The R-value measures thermal resistance, showing how well insulation prevents heat flow. Higher R-values indicate better insulation performance. Closed-cell spray foam offers superior thermal performance with R-values of 6-7 per inch, making it one of the most efficient insulation materials available. Open-cell foam provides about R-3.5 per inch.
Several factors affect spray foam’s thermal performance:
- Thickness: More thickness equals higher total R-value
- Installation quality: Proper application ensures maximum effectiveness
- Age: Minimal degradation over time compared to other insulations
- Temperature: Performance remains consistent across various conditions
Spray foam is particularly effective at sealing air leaks, which can account for up to 40% of energy loss in buildings.
Benefits of Spray Foam Insulation
Spray foam insulation creates an airtight seal that reduces energy costs while improving indoor air quality and environmental performance.
Air Sealing and Moisture Control
Spray foam creates an exceptional air barrier by expanding to fill all gaps and cracks in your walls, attics, and crawl spaces. Unlike traditional insulation, it reaches into tiny spaces that would otherwise allow air leakage. This comprehensive air sealing can reduce energy bills by 20-40% in many homes.
The material also acts as an effective vapor barrier, preventing moisture from moving through walls. This moisture control is crucial for preventing water damage and maintaining structural integrity. It also maintains more consistent temperatures throughout the year.
Blocking air movement eliminates drafts and cold spots that are common with other insulation types. The tight seal also prevents ice dams in colder climates by maintaining uniform roof temperatures.
Indoor Air Quality and Health
Spray foam significantly improves indoor air quality by blocking outside pollutants, as the airtight seal prevents dust, pollen, and other allergens from entering through wall cavities and small openings. For people with allergies or respiratory issues, this improvement in air quality can make a noticeable difference in comfort and health. The reduction in airborne irritants creates a cleaner indoor environment.
The material’s moisture-resistant properties also help prevent mold and mildew growth. By keeping walls and surfaces dry, spray foam creates an environment where these harmful organisms struggle to establish themselves. Additionally, spray foam helps reduce outside noise pollution, creating a quieter, more peaceful indoor environment.
Environmental Impact
While spray foam does contain chemicals during installation, its long-term environmental benefits are substantial. Unlike other insulation materials that may settle or degrade, spray foam maintains its performance for decades. This longevity means fewer replacement materials and less waste. The exceptional efficiency it provides significantly reduces energy consumption for heating and cooling.
This energy reduction translates directly to lower carbon emissions over the building’s lifetime, and a well-insulated home might use 30-50% less energy for temperature control compared to poorly insulated alternatives.
For sustainable building projects, spray foam’s contribution to overall efficiency helps achieve green building certifications. The material’s ability to create a tight building envelope is particularly valuable in eco-friendly construction approaches.
Comparing Spray Foam to Other Insulation Types
Spray foam insulation differs significantly from traditional options in both appearance and performance. Different insulation types have unique visual characteristics and installation methods that affect their effectiveness.
Spray Foam vs. Fiberglass
Fiberglass insulation comes in pink or yellow batts or rolls with a fluffy, cotton candy-like appearance. It’s made of fine glass fibers and is easily recognized by its bright color and uniform shape. Spray foam, in contrast, appears as a solid foam surface that conforms exactly to the space where it’s sprayed.
While fiberglass sits between wall studs with visible gaps, spray foam creates a seamless barrier that fills cracks and voids. This difference is important for energy efficiency. Fiberglass has an R-value of R-3.2 to R-3.8 per inch, while closed-cell spray foam reaches R-6 to R-7 per inch. This means spray foam provides nearly twice the insulating power in the same space.
Spray Foam vs. Cellulose
Cellulose insulation looks like fluffy gray paper particles and is typically blown into attics or walls. It’s made from recycled newspaper treated with fire retardants, giving it a distinctive grayish appearance. Spray foam creates a more uniform surface appearance after installation.
Cellulose settles over time, potentially creating gaps at the top of wall cavities, whereas spray foam maintains its shape and never settles, providing consistent insulation throughout its lifetime. Cellulose offers an R-value of around R-3.5 per inch and is more vulnerable to water damage, while spray foam is highly water-resistant.
Installation and Application
Installing spray foam insulation requires careful planning and execution to maximize its benefits. The process involves several stages from preparation to post-installation considerations, all crucial for achieving optimal thermal performance and air sealing.
Preparing for Installation
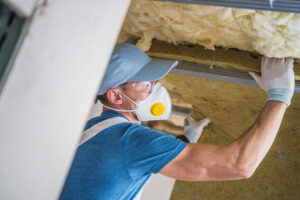
The space must be cleared completely, especially in attics where clutter can interfere with proper application. Then the insulation team will ensure the area is clean and free of dust, moisture, and debris. Temperature is also critical as most spray foam products require specific temperature ranges (typically 60-80°F) for proper curing.
The building envelope should be inspected for existing issues like water leaks or structural problems that need addressing before installation. Proper ventilation must be established, and nearby HVAC systems should be turned off to prevent the circulation of chemicals.
The Installation Process
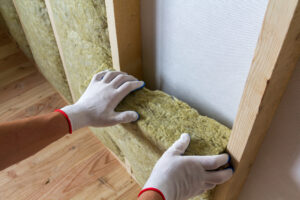
Spray foam comes in two main application methods: professional installation with large equipment or DIY kits for smaller projects. For residential homes, professional installation often provides the most consistent results. Technicians apply the foam in layers, carefully filling cavities between studs, joists, and rafters. This creates a seamless barrier that prevents air infiltration and drafts.
The application begins by mixing the chemical components—typically a polyol resin and an isocyanate—which react to form the expanding foam. When sprayed, the mixture expands rapidly (up to 100 times its liquid volume for open-cell foam) and adheres to surfaces.
Special attention is given to areas prone to air leaks such as:
- Wall-to-attic connections
- Around windows and doors
- Rim joists
- Electrical and plumbing penetrations
Post-Installation Considerations
After application, spray foam needs time to cure completely—typically 24-48 hours. During this period, the area should remain unoccupied due to off-gassing, and proper ventilation must be maintained throughout the curing process. Once cured, the excess foam may need trimming, especially if it expands beyond the intended areas. This ensures a smooth surface for drywall or other finishing materials.
Quality assurance checks are important post-installation, which may include infrared scanning to identify any missed spots or areas with insufficient coverage in the building envelope. These inspections help ensure the insulation performs as expected reducing energy costs and preventing drafts.
Some spray foams have a high global warming potential, so proper disposal of containers and unused products is important for environmental responsibility. People with asthma should only return to the space only after complete curing and thorough ventilation.
Get in touch to arrange an energy audit of your home to ensure it is properly insulated and free of air leaks.